Step by Step:
Cave of the Storm Nymphs
By Jim DeRogatis
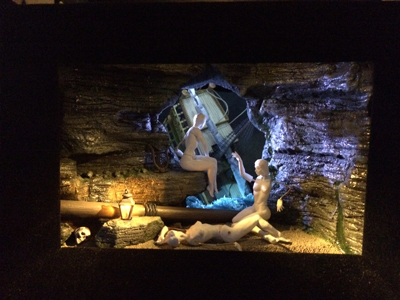
“Cave of the Storm Nymphs” was inspired by the 1903 painting of the same name by the late-Victorian-era artist Sir Edward Poynter, who was generally fond of maidens, nymphs, and sirens. I stumbled across it on the Web, was struck by the composition and the contrast between the cool lighting outside and the warm lighting inside the cave, and thought this would be a perfect subject to try in a box diorama, as well as serving as an entertaining diversion from historical modeling. (Gotta love the naked nymphs! Which, in my case, started out as 1/24th scale Preiser “Eve” styrene nudes before being heavily converted.)


Here you can see the progress through various steps of blocking in the scene. Because the sight lines through the viewing window, the reveal, and the opening of the cave all were going to be key, I spent a lot of time playing around very early on, though as noted in earlier articles (and every box diorama maker I know will agree), the more time you spend planning, the better the finished product! Once I got past the cardboard and foamcore stage, the walls and roof of the cave were carved from balsa foam, which is ideal for this sort of thing; once the shape is set, coat it with clear resin then prime so it hardens and takes paint better. The ship is an old 1/144th scale Heller model called La Sirene—an irony that, believe it or not, didn’t even strike me until late in the project!


The “sea” takes shape, courtesy of Aves Apoxie Sculpt. The diorama was designed as two modules: the sea on the overall tray to fit into the box, and the cave in a smaller “mini-box” to fit in front of that, allowing for greater flexibility in working on each. As I got further into the project, the exact shape of the opening of the cave changed many times, conforming to what could (and could not) be seen. The sea was painted in oils and the ship (which, needless to say, was hacked up with a razor saw) was painted in acrylics.
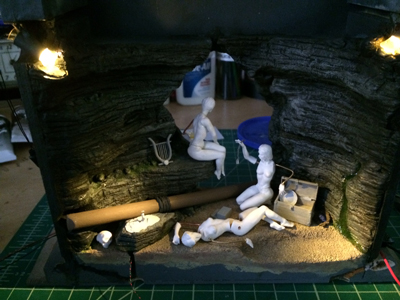


As always, I started working on the lighting early on, tinkering constantly along the way, since the lights (my usual LEDs; warm white inside, cool white outside, both tinted with various theatrical gels) have an enormous impact on positioning and painting. The lantern is an ultra-mini-LED chip set in a Historex piece; the other warm “cheater” spots are in the upper corners of the cave and on the reveal. The cool exterior lights are mounted on the back of the module/mini-box holding the cave.


The ship in the storm-tossed sea is nearing completion. The whitecaps are a Woodland Scenics water effects product. The thin white plastic backdrop curves to create the illusion of infinity (and the dark back there helps!). I used the airbrush to try to capture a bit of a stormy-skies vibe, but my airbrushing skills are rudimentary at best.


More tweaking of the lights. The broken mast, the small chest of gold coins, the trunk full of other goodies, the skull, and the lyre all were scratched. You can see here how the lantern came together, with the wires from the super-small LED running down through the rock.


Finish-sculpting of the figures. Sometimes, I find it easier to do the final bits of sculpting after I’ve primed the figures once, so I can see any flaws that still need fixing.


The box diorama is finished (penultimate photo)… or so I think for a couple of weeks, until, heeding the advice of my pals and mentors Joe Berton and Shep Paine, I make a few more final tweaks to the lighting and, most significantly, insert a very thin clear plastic “scrim” over the opening of the cave after lightly misting it with some clear flat spray. This gave an added and very dramatic effect of mist/hazy rain outside, and greatly enhanced the forced-perspective illusion of the ship “fading” into the distance, which you can see in the final photo. Overall, I was happy with the lighting effect and the forced perspective, though the latter can, in my experience, be very, very difficult to pull off. Bravo for other modelers on this site who have done it well!