
The Council At Fili, Step-by-Step
By Hervé Dagès
As a hobbyist I have been painting Napoleonic miniatures for about a decade, mainly 54mm, quite a few 35mm and a couple of 70mm. Just retired from a long military career, I wanted to undertake something quite substantial and a box-diorama seemed to me the perfect project. And it gives me the opportunity to pay tribute to Sheperd Paine whose works and books had such an influence on me. In this step-by-step article, I do not intend to tell anybody what to do but only to show what I did and what my difficulties were. Keep in mind that it is my first box-diorama.

The Original Painting
I had in mind a painting by Alexei Kivshenko representing the military council which took place on September 13th, 1812, where the decision of abandoning Moscow to Napoleon was taken. The painting was studied in depth in the French magazine Gloire et Empire n° 66 (June 2016). This article was a good start for my historical research about the attendees. I checked particularly the ranks, ages, appearances of the officers and the military decorations and sashes they wore on that day. I found the Russian site http://museum.ru/museum/1812/Persons/Russ/list_r.html very useful for that. (Nota: I do not understand Russian, so I use Google Translate.)
The Miniatures
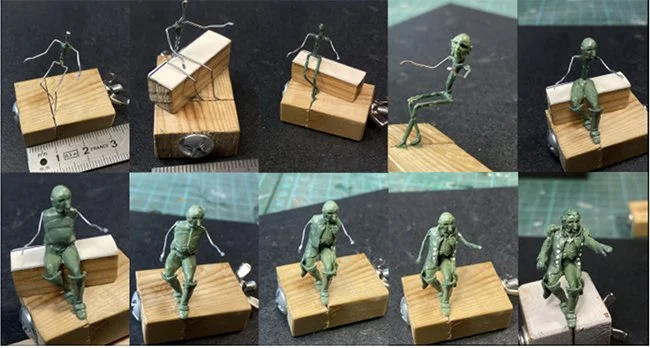
The scene consists of 11 military personnel (from left to right: Col Kaissarov, Marshal Kutuzov, Gal Konovnitsyn, LG Raevsky, LG Osterman Tolstoy, Gal Bennigsen, Gal Barclay de Tolly, LG Uvarov, Col Von Tol, Gal Dokhturov, MG Ermolov), a young girl (Malasha) and a cat. For that reason, I decided to use 35mm figures. My first challenge was to get the figures I needed. I first though of using Perry and Front rank miniatures, but I found that the scales of the two makes were too different and worse that they were, not to say impossible, very difficult to transform. So I decided to create them from scratch. I never sculpted a figure ever, so I was quite doubtful of my capacities. I tested myself on the cat using Magic-Sculpt. After a few attempts I succeeded to get a moggy of the right scale. It was my green light to carry on with the project. For the figures I followed Tom Masson’s techniques which he develops fully on Youtube in a series of videos https://www.youtube.com/c/TomMasonSculptor/featured.
To visualise the whole scene before and during sculpting I used a Japanese software Clip Studio Paint which allowed me to create virtual 3D figures which I could shape easily and put together in a virtual scene. My first figure attempts were made of Fimo, but I found difficult to add thin lays or details on a figure in progress, baked or not. So the final ones were made with a mixture of Magic Sculpt and Green Stuff. They are a bit less than a 8-head figures. The scale used through out the project was 1/48. It took me hours and hours to figure the dimensions of the scene. To this end, I used a piece of foam to pin the figures in and a mock reveal made of cardboard to find the right angle of view. I went for a wooden base of 126mm x 200mm on which the scene will be build. The scene is at quite an angle with the front.
It took me hours and hours to figure the dimensions of the scene. To this end, I used a piece of foam to pin the figures in and a mock reveal made of cardboard to find the right angle of view. I went for a wooden base of 126mm x 200mm on which the scene will be build. The scene is at quite an angle with the front.
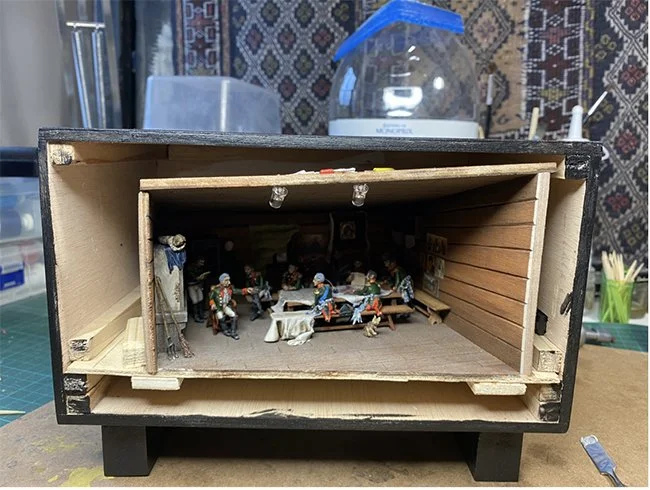

The Inner Box
I used 3mm thick plywood for the inner box, but I wish I had used 5mm because my back wall bent itself due to paint and gluing. The inside dimensions of the right wall are 120x82x54mm, 77x73x54mm for the left one and140x54mm for the back. But do not forget adding the widths of your walls (3mm in my case) and of the wood laying if you use any (1mm) to calculate the exact dimensions of your pieces of wood for cutting. I kept the floor horizontal, but to add some sensation of depth, the ceiling makes an angle of 13° with the floor.
The floor board and the walls were covered with 1mm balsa wood with I textured. The use of balsa wood was not great as it does not keep well its texture and smoothness when painted with acrylics (despite a good undercoat). I should probably have varnished it before starting the weathering process. Everything was glued with wood glue. The gluing of the walls to the base were reinforced here or there with little block of wood.
The Decor
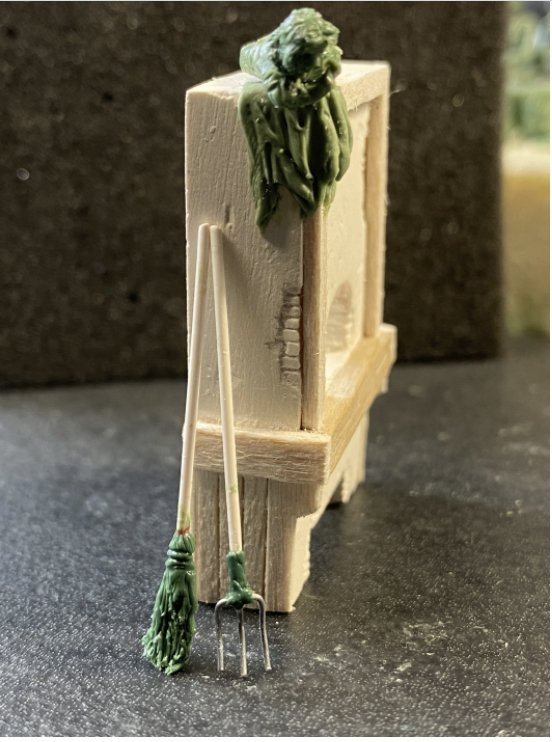
The furniture is made of balsa wood (1 and 2mm thick), the glass pieces of a hard plastic packaging. The maps on the table (reproduction of maps of Moscow and Russia at the time) were found on internet and printed on paper then varnished for preservation. Same for the icons, except that the prints were too dull so I reinforced the colours with oil paints. The Russian oven was made with plaster and balsa wood. The tools were made of toothpick and metal wire. The curtain is made of cheese cloth and was painted with acrylics.
Painting
The miniatures were painted in oils over acrylic paints (Vallejo). For undercoating my minis I used Corax White spray paint (citadel). I used different acrylic base coats for the floor (grey), side walls (brown), back wall (orange) and ceiling (dark brown) then I alternated several oil washes and dry brushes. The part of the outside box which could be seen by the window on the back wall was painted in white (The white colour reflects the warm white colour of the LED). The outside box was painted in satin black in order not to attract any attention.
Once everything painted, cut and ready to be put together, I started to put the figures into place. To this end I copied on tracing paper the exact place of each figure from my block of foam, then I transferred the markings onto my wooden base. Before performing the drillings. I add two thin pieces of wood under my base to let the pins of the figures sticking out a bit underneath. It did facilitate the placing and gluing of the figures. Then I glued the walls and last the ceiling. At this point you cannot modify anything.
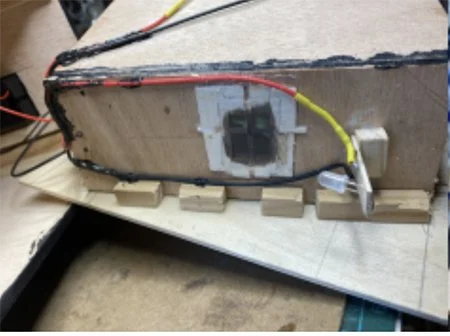
Electricity
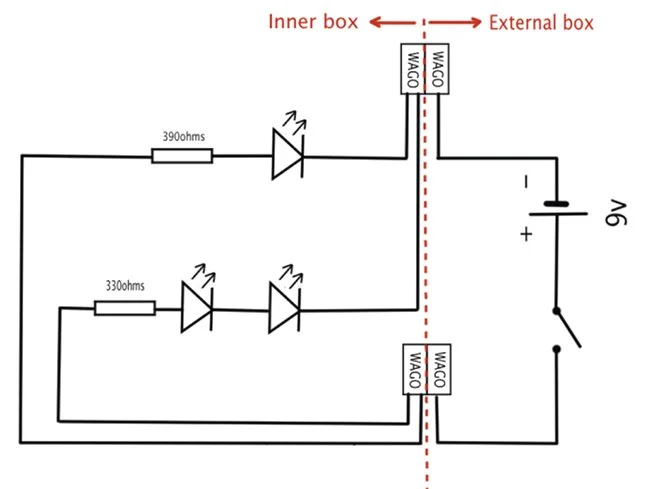
As I was completely ignorant about electricity, it took me a while to understand what I needed. I chose to use three 5mm LED lights powered by a 9v battery and a power switch. The light coming from the back wall window is a wide angle (60°) warm white LED (3.2v, 30mA). The other two are narrow angle (30°) warm white LEDs (2~3.2v, 20mA). One is lighting the table, the other one Kutuzov. As the sum of the 3 LED voltages could have been higher than my power (3.2+3.2+3.2=9.6v) I had a risk of not having enough of it. So I put the two front LEDs in a series circuit. The one at the back will be then in parallel.
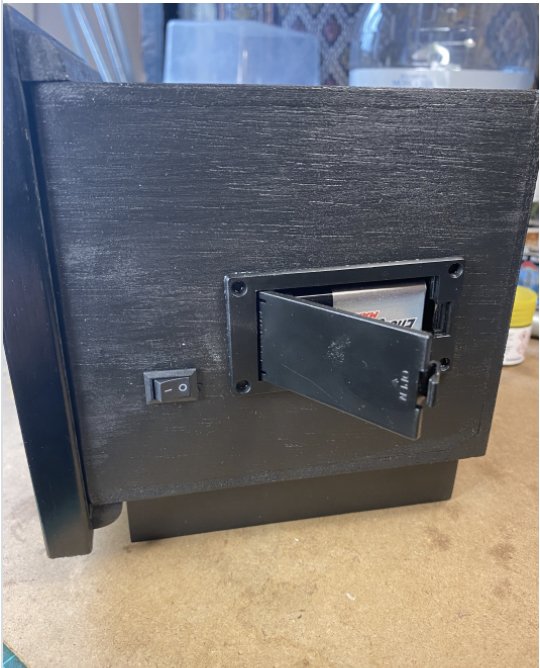
The LEDs are glued to either the back wall (on the external panel) or the ceiling of the inner box. The resistances are soldered and the wiring glued. The 9v battery goes in a plastic battery case I found on internet. Both the power switch and the battery case are inserted into the outside box (as I could not find my jig saw I used a chisel to carve the openings in the wood panel). The links between the circuit fixed on the inner box (LEDs and resistances) and the outside box (battery and power switch) are made with two Wago connectors. So taking the inner box out of the outside box is not a problem; I just have to slide the inner box out of its frame and lift the levers of the Wago connectors to get it completely free. The front lights turned out to be slightly too cumbersome. I should have used 3mm LEDs but I did not have any at hand.
The Outside Box
The outside box is 200x127x90mm (inner dimensions) and made of 5mm plywood. Here again do not forget to add the dimensions of the wood panels to get the right dimensions for cutting. And on each side (inside panels) I stuck two long thin pieces of wood to create slides for the inner box.
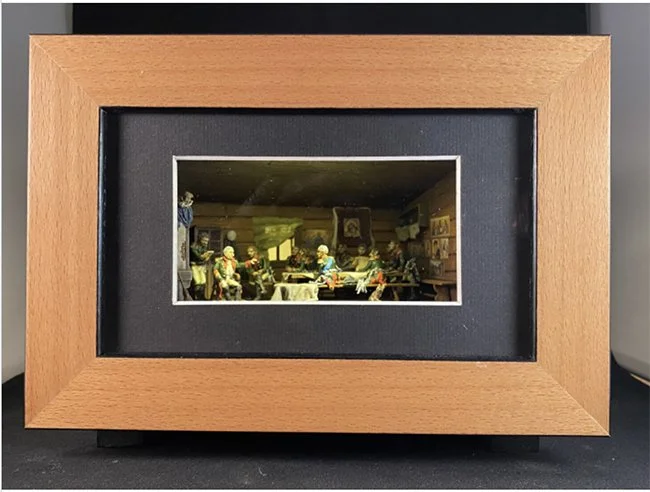
The Frame
The frame is made of light colour wood, glass and a black passepartout. The dimensions of the frame are 220x150mm and its width is 27mm. The passepartout has an opening of 105x55mm. The frame is not properly fixed to the outside box, it slides slightly and tightly in it thanks to four pieces of wood glued on the back of the frame. Then I glued two blocks of wood under the outside box in order to raise it from the surface on which it lays.
This very pleasant project took me about seven solid months of work. At least one quarter, if not a third, of that time was spent in research, preparation and design. As everybody said before, preparation is the key element for such a project. I made a few mistakes along the way (choice of balsa, wood panel too thin, plywood, resistance too weak for the front LEDs, a few wrong measurements, electric wires too thick, front LED a bit too big, wrong trousers for colonels Kaissarov and Tol etc.), but it did not discourage me to start a new project.