Barry Biediger - NYC 1977: Step by Step
By Barry Biediger
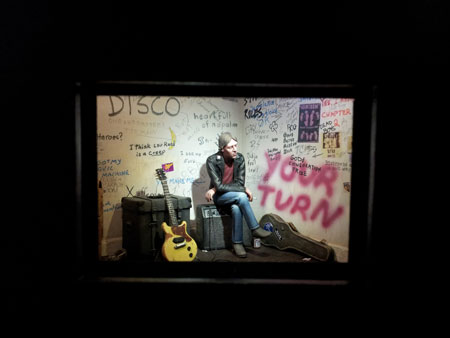
The idea for this box came, as most ideas do, from a couple of different origins. The initial spark was a story about a musician-friend’s pre-show ritual, which includes some quiet time alone with a cup of coffee after a few beers. I had for some time also thought about sculpting a figure based on a picture of the early punk guitarist Johnny Thunders of the New York Dolls. These ideas eventually combined into one and the scene became an anonymous guitarist sitting backstage in a quiet, pensive moment before his gig starts sometime during the original punk explosion of the 1970s in New York City.
I first planned to make a simple scene with the figure sitting on an amp and his guitar nearby, all on a small base. Early on, the idea of making it a small “box vignette” began to appeal to me. By enclosing the scene in a box, the lighting can be fully controlled, allowing the mood to be set for the piece. More importantly, however, is the ability to create the feeling of a miniature world that exists beyond the viewing window of the scene. In my opinion, this feeling simply cannot be achieved as effectively with an open vignette. These qualities of box dioramas have fascinated me since I first saw photos of Shep Paine’s work as a young teenager in his book How to Build Dioramas. More recently, John Long’s small scenes set inside cigar boxes have inspired my interest in experimenting with smaller enclosed scenes.

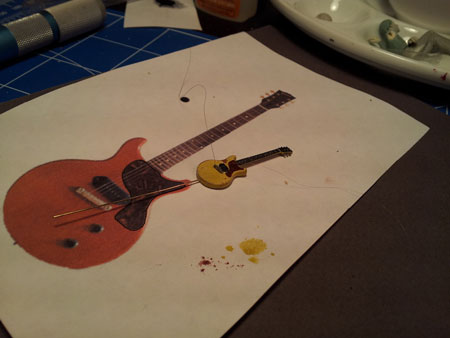

Since I knew it would be the most difficult single item to scratchbuild, I started with the guitar. I chose a 1958 Gibson Les Paul Junior. Although it was designed as a low-cost “student” model in the 1950s, the Junior was made for punk: inexpensive (at least it was in the ’70’s,) well-made, and with a nasty snarl perfect for straightforward rock ’n’ roll.Thunders primarily played a Junior and his well-worn instrument was the inspiration for mine.
The guitar was carved out of bits of sheet plastic onto which I had traced the outlines from a photo of the actual guitar, scaled to 1/32nd. Once the basic body and neck were shaped, I started adding the details, taking care to keep everything as in-scale as possible. This was a challenge when it came to some of the parts, but I think the time spent carving near microscopic plastic tuning knobs glued to tiny brass wires and getting the spacing of the thin stretched-sprue frets just right paid off in the end.
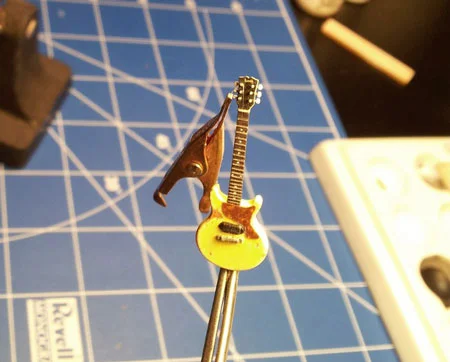
I debated whether to add strings, since I wasn’t sure I could make them true-to-scale enough. I decided I had to try. Strings were noticeable on the photo I used as a pattern, even after I scaled it to 1/32nd. Besides, I wanted to have the lights glint off them at certain angles, just like they would on a real guitar. The only way I could think of to get strings on it was to make the bridge so it could be strung up like the real thing. This meant I had to include six tiny holes through the bridge to poke strings through. A #80 drill is far too big for this, so I used tiny bronze wires, approximately .004” thick, made for rigging biplanes. Instead of drilling holes, I sandwiched these wires between 2 strips of plastic, which were glued together with plenty of liquid cement. When the cemented plastic had set, it was cut to the basic shape, then the wires were pulled out, leaving nice .004” holes through the bridge. The completed guitar was painted with Vallejo and Reaper acrylics. The frets and bridge were painted with Testors silver enamel.
After painting, I added the strings. I used fibers from the insulation inside a computer cable for the smaller strings. For the two biggest ones, I used sprue from a clear tree in an aircraft kit that was heat stretched as thin as I could get it. I used superglue to create balls on the ends of the strings to keep them from passing through the bridge holes. Each string was threaded through the holes in the bridge, wrapped over the bridge, then wrapped around its corresponding tuner post and held tight with the weight of small heat sinks clamped on the end. I put a tiny dab of white glue to hold the string on the post.
The figure was sculpted over an armature of brass wires glued into a pelvis and torso which were cast in resin from my own patterns. The head is from a Hornet set and the shoes are from Michael Roberts. I took my time trying to get his crossed legs and slouched back looking just right before I started adding putty to solidify the pose.
When it came to the clothes, I wanted to avoid the clichéd “punk” look. During its heyday in the 1970’s, the New York City punk scene was not characterized by what would later become stereotypical punk fashions such as mohawks, piercings, chains, etc. Aside from some unique and eclectic clothing worn by some notable characters, punk bands as well as their fans were most commonly seen wearing everyday clothing of the time. My punk is dressed in plain jeans, T-shirt, and a Ramones-style leather jacket, a popular item of the period. I also aimed for a period-correct hairstyle: over the ears, parted in the middle. I painted him with somewhat understated shading, preferring not to overpower the scene with extreme contrast.
As can be seen in the photos, I made the amplifier before posing the figure to make sure the figure sat correctly on it. It was made from .040” plastic sheet, cut to the approximate size of a Fender model common at the time. The control plate was printed on a clear overhead projector sheet with a laser printer. The speaker grill cloth is from a woven cloth cut from a ribbon found at a craft store.
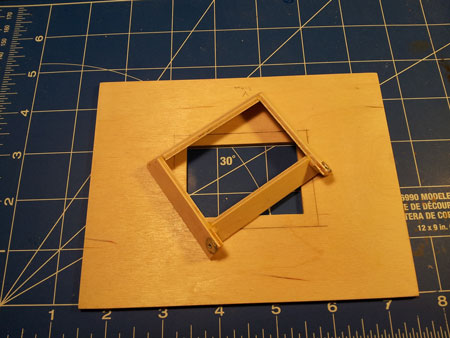
After I had the figure fleshed out, I was able to design the scene around him, laying out the floor plan on grid paper. Pieces of foam core were used to establish the location and angle of the walls. I concentrated on getting the right distance from the viewing window to the figure. I wanted enough depth in the scene without having the figure so far back that the area would be too big for a single figure. I used pieces of cardboard to figure out the size of the viewing window needed to properly frame the scene. Once I had the floor plan and viewing window drawn out, their measurements determined the size of the reveal, walls and outer box. The pieces were cut out of birch plywood. Once glued together, I used velour paper to cover the inside of the reveal.


I had a lot of fun scratchbuilding small details that were used to set the scene as well as add some interest: Whiskey and beer bottles; beer boxes; a drummer’s trap case to rest the guitar on; the road-worn guitar case; a broken drumstick tossed to the floor; the light switch, etc.
Graffiti is commonly seen in any picture of the backstage areas of clubs during this era. I added this with artist’s rendering pens, mechanical pencil, and an airbrush. For my graffiti, I primarily used lyrics from American punk songs of the era, along with actual things I saw written on walls in pictures from the time. To these, I added various cryptic references that may or may not mean anything to anyone else but me. A few small posters printed on my inkjet printer were added to the walls as well.


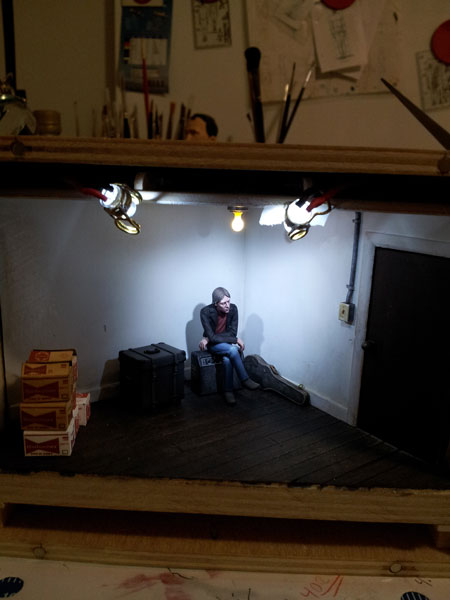
I lit the scene with two bright white LEDs which I connected to dimmers. This allows me to adjust the light for different display conditions. One LED to the front of the figure functions as a spotlight; another to his right is used as a fill. I fabricated LED mounts from brass wire. Gel holders were also made from brass wire, soldered to the LED mounts. I used golden orange lighting gels cut from a sample book to warm the light coming from the cool white LEDs. I also added a diffusion filter to the fill LED to soften shadows.
I made a light bulb for the ceiling by turning a clear acrylic rod in my Dremel and shaping it with files and emery boards. I drilled connected holes in the top and the side not visible to the viewer to allow me to insert a tiny (approx. 1mm square) surface-mount LED. This LED was carefully wired with fine-gauge enameled wire fittingly sourced from the windings of a cheap P90 pickup, the same type used in the original Les Paul Junior! The light bulb was painted with transparent yellow paint and matte varnish to give the effect of a warm, incandescent glow when the tiny LED was illuminated.
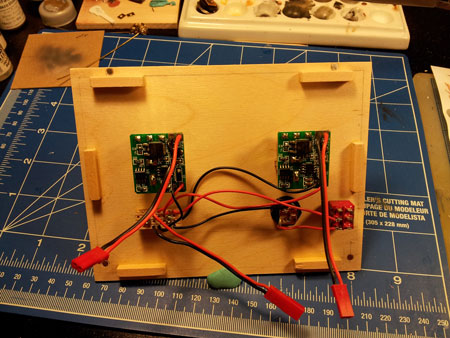
I added a rear panel to the outer box to which I mounted the dimmers, a jack for the adapter, an on/off switch and a small piece of strip board used in place of power terminals to hook up the LEDs to the power source. The wires to the LEDs mounted on the scene itself were fitted with plugs to make it easy to disassemble the box if needed. This rear panel, like the front frame, is held securely in place with counter-sunk magnets.
I hope this scene successfully conveys a bit of the atmosphere of an era in music that is dear to my heart.
(Photo above by Bob Sarnowski at the MMSI 2013 Chicago show, where the box won a gold medal.)