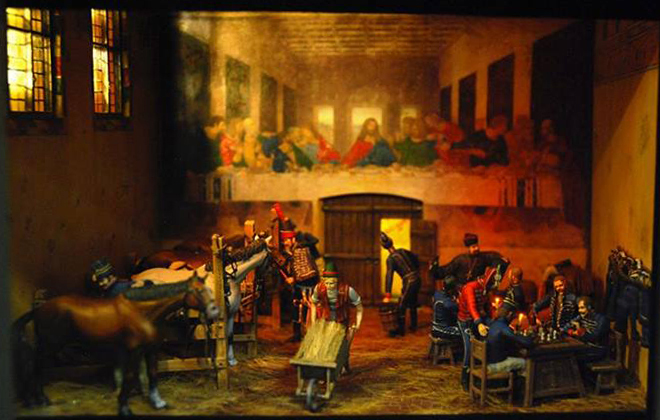
Step by Step:
Il Cenacolo
By Jim DeRogatis
With Milan serving as their base during the 1798 campaign in Italy, the French stabled their horses in the refectory of Santa Maria delle Grazie. The hussars paid only slightly less reverence to the painting on the North wall than the Dominican monks had; in 1550, two years after da Vinci completed his commission, the abbot, aggrieved that his dinner arrived cold, cut a door in the wall and cut off Christ’s feet. (During WWII, the Allies did worse, dropping a bomb that destroyed the other three walls and the ceiling.) Eventually, French Viceroy Eugène de Beauharnais brought the work to the attention of his stepfather. Napoleon relocated the troops and began a process of preserving “The Last Supper” that continues today.
My friend Joe Berton suggested the topic of this box one day when we were discussing a potential follow-up to my “Spoils of War” Louvre scene. “You know, I always thought Napoleon stabling his horses in the dining hall where da Vinci painted ‘The Last Supper’ would make for a great scene!” he said with his usual enthusiasm, and I was off and running. The research turned out to be a daunting task: There is much more misinformation than fact about the specifics of this peiord (for example, French soldiers never used the figures in the painting for target practice, though that tale is often told). But after wading through a dozen books on Bonaparte’s Italian campaign and the history of “The Last Supper,” I found several sources that were helpful and, I believe, authoritative, especially The Napoleon Anecdotes Volume 3 by William Henry Ireland and the recently published Leonardo and the Last Supper by Ross King, the definitive history of the painting. Also hugely helpful for details on the refectory was The Last Supper and Santa Maria delle Grazie (Artistic Guides, English edition) and an excellent Web site that allows one to see 360-degree perspectives on the dining hall. Finally, for specifics on the care and stabling of Napoleonic cavalry horses and details of the saddles and bridles, I found Au Galop! Horses and Riders of Napoleon’s Army by Paul L. Dawson to be invaluable, and I can’t recommend it enough to anyone modeling Napoleonic cavalry. I am proud to say this box claimed a gold medal at the MFCA show in May 2013 and a bronze medal at the World Expo in Stresa (not far north of the painting and its home in Milan) that July. Special thanks for the advice and inspiration to Joe, Shep Paine, Mike Cobb, and Barry Biediger!


Invaluable research materials.


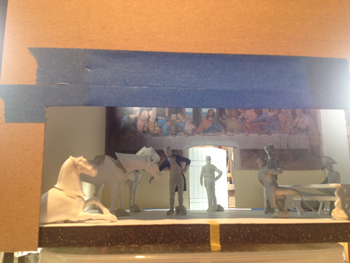
Starting out: Positioning some scrap Historex figures around a scaled print-out of the painting; checking the walls, and playing with a viewing window.


Resin castings of the ceiling arches and the plywood walls of the refrectory.
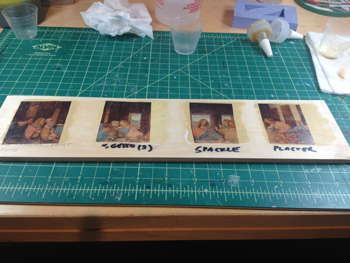

My plan was to make an ink-jet decal of the painting to scale, apply it to the wall, and paint over it. First, I needed to test how it would sit best and tested that over several surfaces (artist gesso, spackle, plaster, etc.). The gesso worked best, and the photo on the right shows the gesso-primed walls.

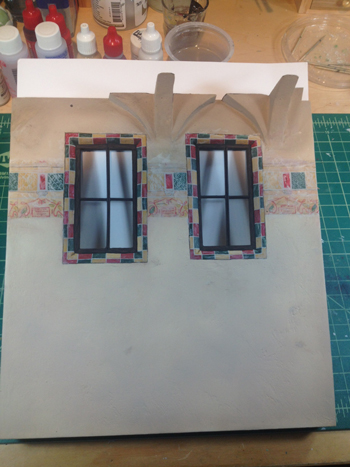
Painting and weathering the left wall, with the pattern based on my research.
Applying the decal of the painting over a coat of clear gloss Future floor polish, just as aircraft modelers do.
Beginning to paint the painting. This turned out to be a long, tedious process, since the acrylics took forever to dry on the glossy decal surface. I wound up doing this work in between lots of other tasks, taking a break, sometimes for weeks, when I got tired or bored. Eventually, almost the entire surface would be repainted (sorry, Leo!), with damage/spots of decay added as appropriate. Then the painting was sprayed with a few coats of matt finish to eliminate any remaining shiny spots. The process worked better than I could ever have hoped, truly making the painting look as if it was painted on the wall in oils, just as da Vinci did it. (Contrary to popular belief, it is not a traditional fresco, where the paint is mixed in with the plaster.)


Painting and positioning progress, still with temporary Historex pieces, but here I have started to build the pens for the horses. You will see that it took two attempts, with the first on the right obscuring too much of the horses and turning out not to be as accurate, based on my research.
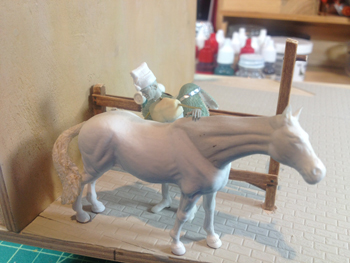
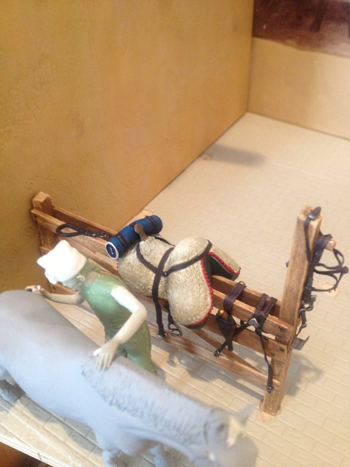
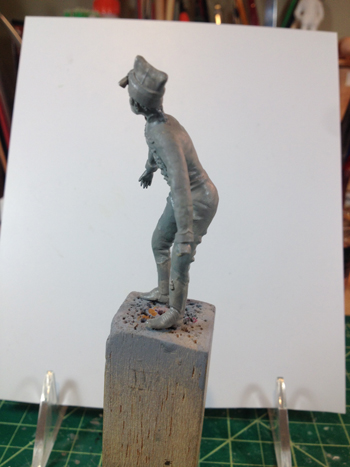
Sculpting in progress on figure number one and horse number one. (The final diorama features 13 figures, just like the painting, plus four horses and a dog.) I started with the soldier brushing the horse with his curry comb, a tribute to my friend Shep Paine’s famous Historex vignette “The Sergeant’s Mare.” The figures consist of resin Nemrod/Historex heads, many of them reworked, plus some hands and feet; the rest is all scratch. The horses began in the classic method of shimming Historex pieces, and resculpting the necks (with bridles scraped off and eventually rebuilt), tales, and manes. With the exception of some stray buckles, all of the horse tackle was scratchbuilt, while the Historex saddles were heavily reworked.
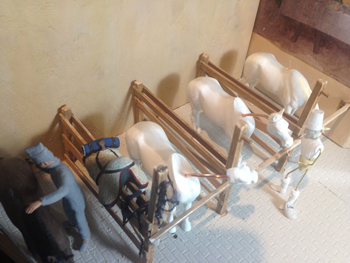

hile my early tests determined how many horses I wanted in the box, based in part on research into the French regulations for the space required to picket horses on campaign, I played around a lot with positioning each horse in relation to one another and the figures. On the right is the beginning of the hussar feeding his mount a carrot, the second figure playing off “The Sergeant’s Mare.” (Shep’s rider gives his mount an apple.)


Four months into the project, the horses are sculpted and primed and sculpting of the figures is progressing. All of the lace on the 1st Hussars’ uniforms is sculpted. For the pelisses, I cut a rough form out of sheet lead and sculpted over that to have something to hold the putty.
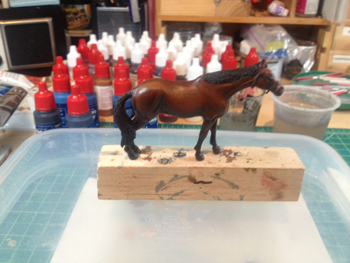


Painting the horses progresses; here, I used oils. As you can see, when I wanted a break from painting horses, I went back to painting the figures with my usual acrylics. The third sculpted figure is the soldier in the back on stable clean-up duty.


At every stage, I continued to tweak the positioning, concentrating on how horses and figures were interacting, but generally staying to the plan that was set in the beginning at the earliest stages. I cannot stress how important it is to work out as much as possible early on! Another lesson learned the hard way: Begin working on your lighting early on, too, so you can check throughout how the project is coming together under some approximation of the final lighting in the box. It can look fine on the workbench and awful in the box, or vice-versa, so it is critical when building a box diorama to continue checking every element to ensure a satisfying finished whole.


Positioning my stick figures around the table. The chess set is an old diorama accessory from Phoenix Miniatures; the table, chairs, and benches are heavily reworked Historex items. I screwed up by gluing the chess board down too soon; I positioned the pieces based on a famous chess victory researched on the Net, but glued the losing side pointing to what I intended to be the winning hussar. I panicked for a good hour until my pal Barry Biediger pointed out that I could just swap the losing sapper with the winning hussar without hurting (and in fact improving) the composition. A bullet dodged!


Barry also helped with posing the soldier carrying the water bucket and noticing for the first time the painting at the back of the dining hall. I needed to get this figure right, and it was tough going, until he sent me the sketch above. You will see in one of those photos that I even had my wife take some pictures of me carrying a bucket in the way that I wanted the figure to be doing it!


The guy with the bucket, glued in place a long time later. I think I got it... almost, but not 100-percent. The jolly, chubby priest on the right also took a few attempts. I was going for a bit of a self-portrait, and Shep and Joe kept telling me the figure was just not fat enough. (With friends like these... !) In the right corner, you can sleep the farrier sleeping one off in the corner, with the dog licking his toes.


Painting and sculpting continue to progress. I am now almost nine months into the project. Friends often ask how I can focus on something for so long without getting discouraged or distracted. But one thing I hope that these Step by Step articles accomplish is showing that one big box diorama project is really a dozen smaller, equally fun projects, all spread out but eventually coming together!
The finished table, with some Historex wine bottles and plates, and scratchbuilt Italian snacks (mmm!). The candles were scratchbuilt using the ultra-tiny nano LEDs from my favorite supplier, Evan Designs ModelTrainSoftware, with the wiring hidden underneath the table and leading through a hole concealed by the rear table legs.


The last two figures, a trumpeter consoling the sapper who just lost the chess match, and an Italian peasant boy pushing a wheelbarrow full of forage. I prime all my finished sculpts with Humbrol primer, but I had an old tin that had turned glossy, hence the sheen on the trumpeter. It did not affect the finished painting in acrylics (using Vallejo, Andrea, and Reaper).
The dining hall is nearly finished, and I am ready to begin gluing everything into the million holes drilled in the floor that you cannot see. This is one of the never-ending test shots to check the lighting, which went through many iterations in terms of positioning, intensity, and colored gels until I was finally satisfied.
The gluing and groundwork begin. I made a lot of hay by cutting to scale various brands of field grass, and airbrushing different batches slightly different shades of tan and gray-green. The brick floor was treated with many different washes of thinned oils and pigments.


All of the figures and accessories in place, just before adding the right wall and the ceiling (which really cannot be seen, unless somebody really cranes their neck to try to see what is up there, but there always is one person like that at any show!). Below is another shot of the finished diorama by the great Nick Infield taken at the MFCA show in May 2013, and one by Pennie Meyer at the same event. And finally, Barry and I celebrate our MFCA gold medals (he took his for “New York City, 1977”).


Here are some additional shots I took of the lighting scheme, since several modelers asked, after showing the box at World Expo in Italy during the summer of 2014 and at the MMSI show that October. You can see the lights outside the windows; the light positioned to shine through the door below Christ’s feet, and the lights on the reveal. All were set in cut brass tubing “spotlight holders” with colored theatrical gels.


While I had the box open again, I also took some shots of details in the left and right corners that are not as easy to see in photographs as they are in the actual piece—which I am proud to say now resides in the collection of MMSI member Dan Bird.
Finally, here are some additional shots of the box taken at the MMSI’s 2014 Chicago Show by Bob Sarnowski.


